

How To Change A Fuel Pump On A 1968 428
All 428 Cobra Jet and Super Cobra Jet Mustangs were originally equipped with a Carter "X" fuel pump. Over time, the rubber diaphragms, seals, and other internal parts within the pump tin can wear out, making it leak or otherwise perform poorly. Luckily, many parts vendors sell a kit to rebuild these pumps using common hand tools.
This web page describes how to rebuild a Carter "X" fuel pump using a kit produced past AMK Products forth with an output fuel line fitting purchased from Mansfield Mustang. Notation that the AMK kit doesn't include the fitting, just the kit bachelor from Mansfield Mustang does. Keep this in heed when shopping around if you lot happen to demand the fitting, because Mansfield Mustang doesn't normally sell the fitting by itself.
Tools needed:
- Medium-sized phillips screw driver
- Small-scale center dial
- Minor ball peen hammer
- Small needle-nose pliers
- Small apartment-bladed screw driver
- Big flat-bladed screw driver
- Ratchet wrench
- 7/16" socket
- 9/sixteen" socket
- White lithium grease
- Anti-seize paste
- Demote vise
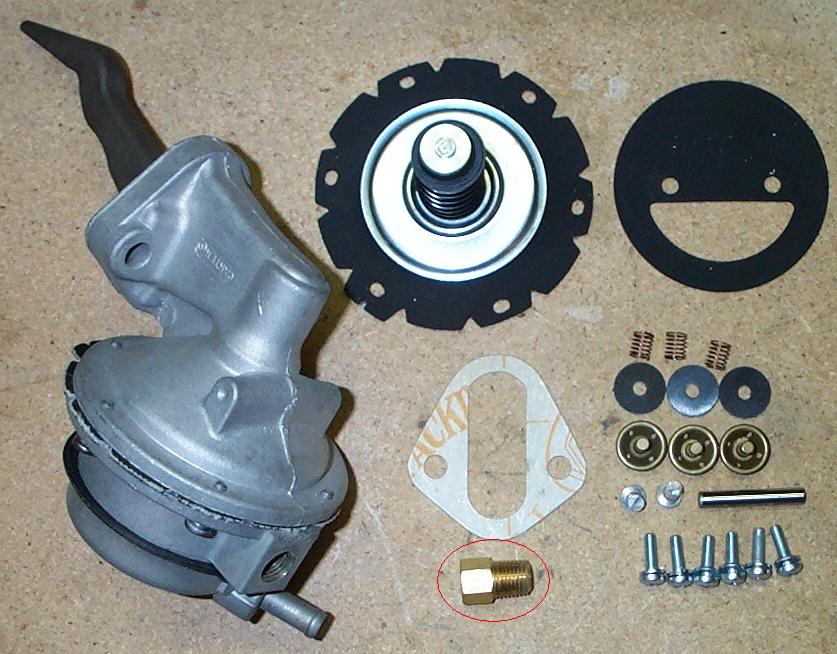
Stuart Cofer graciously provided the fuel pump, kit, and fitting used to write this commodity. The pump, kit, and fitting (circled in red) are shown in the motion picture below.
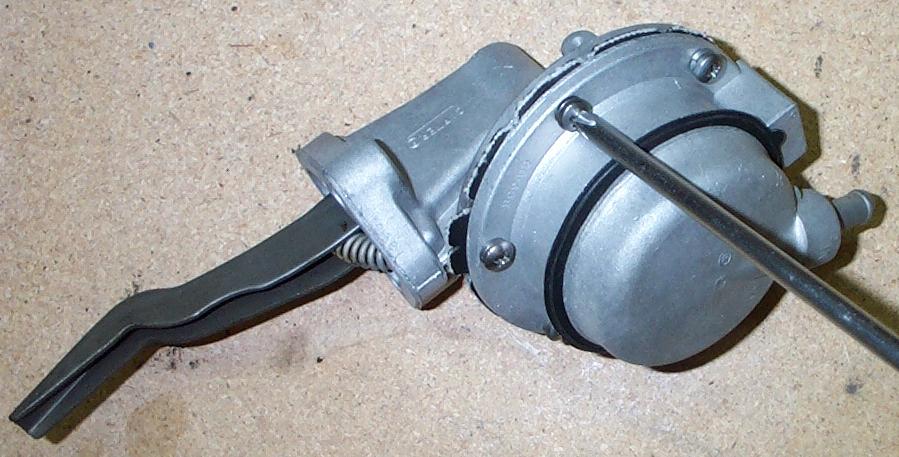
Stride one: Confirm that you lot have all of the parts needed to consummate your rebuild.
Step 2: Showtime the disassembly process by removing the 6 screws that hold the top and bottom of the pump together. It might help to marker the location of the two halves with a pencil or some other removable marking to assistance yous recall where the 2 halves fit together.
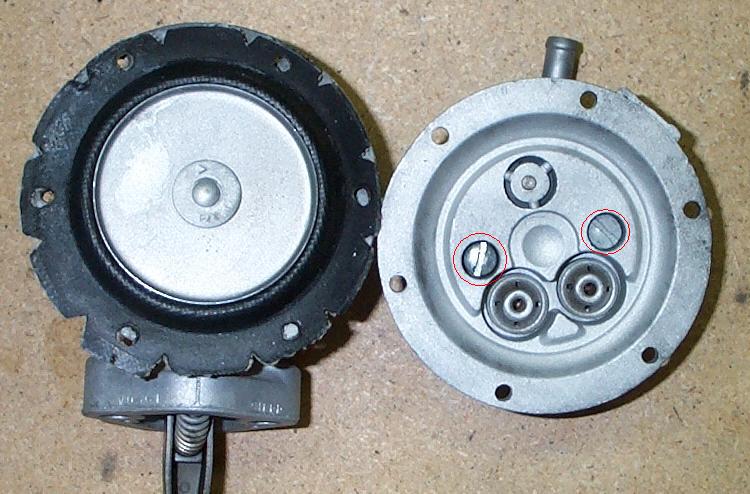
Step 3: Separate the pinnacle and bottom halves of the pump. The two screws circled in red become removed next.

Step iv: Split up the fuel bowl (the bottom half of the pump) past removing the ii screws from the upper half of the bowl. Note that these screws can sometimes be VERY hard to remove if they've corroded at all. Employ the largest screw driver you have available to avoid stripping the heads of the screws. If you do end up stripping the heads you lot'll accept your hands total trying to get those screws out, and they're NOT included in the rebuild kit!

Step 5: Now turn your attending to the summit half of the pump. A demote vise can assist hold the top half of the pump. Y'all might need a helper otherwise.
Remove the plug (circled in cerise) past prying nether information technology gently with the small-scale flat-bladed spiral commuter. It might help to hammer the spiral driver in nether the plug; avert doing whatsoever harm to the body of the pump itself. Notation that yous will most likely break off a pocket-sized bit of the tab (circled in green) that'southward staked over the plug. This is normal.

Step six: Remove the bound that fits between the housing and the actuator arm. Be careful when removing the spring as this part, also, is Non included in the rebuild kit!

Footstep 7: Remove the spring perch past lifting information technology out of the housing. Once it's out of the style you should exist able to see the dowel pin that holds the actuator arm in place. Slide the dowel pin out using a pair of needle nose pliers. One time the pivot is out yous can remove the arm and the large diaphragm. Just pull, the diaphragm should come out with some gentle persuasion.
Now is the time to clean all of the parts. Some people like to bead blast and pigment the housing. Bead blasting and paint can assist if the housing is really muddy or corroded, but exist sure to carefully clean out all of the blasting residue. Compressed air or thorough washing should do the flim-flam. I adopt to skip blasting if the housing is in overnice shape as this i is.
Now that the summit half of the pump is disassembled, accept a look at the area around the dowel pin hole plug. If the pump has been rebuilt before in that location'southward a risk there won't be any tab fabric left. If your new plug fits snugly you're probably OK without any tab material. If the plug is loose, though, you'll have to figure out a style to keep information technology in place. It might be worth threading the pigsty and inserting a threaded plug if you lot really desire to save the pump.

Step 8: Back to the bottom half of the pump. Push button out the small check valves using the punch and hammer. Be certain to note the direction in which they came out! Assemble the iii new valves equally shown in the pic.

Step ix: Tap the cheque valves into identify using the 7/16" socket. 2 valves face upwardly, 1 faces down. Tap them in until the mounting pins are affluent with the housing.

Step ten: Install the new gasket over the lesser half of the fuel basin as shown in the picture.

Step 11: Rejoin the two halves of the fuel bowl using the screws you removed in stride four. I like to apply a small amount of anti-seize on these screws to aid the next guy who might need to rebuild the pump. Install the outlet fitting using the ix/16" socket.

Step 12: Reassemble the peak one-half of the pump by pressing the big diaphragm into the top half of the housing. Place a piffling scrap of white lithium grease on the internal cease of the actuator arm. Fit the arm dorsum into the housing and so that information technology's nether the safety washer and above the larger of the two metal washers on the plunger attached to the diaphragm. Be sure to line up the holes in the arm with the holes in the housing. Grease the new pin and install it in the housing to hold the arm in identify.
Place the associates back into the vice or telephone call your helper again. Reinstall the spring servant and the bound between the housing and the spring servant. Reinstalling the spring is probably the most difficult part of this process. I establish information technology helpful to seat the jump against the housing, then to hold and bend the spring with the needle-nose pliers while using the small flat-bladed screw driver to motility the lesser of the bound onto the retainer. It's non easy, so please be patient and conscientious -- you don't desire to lose the jump! Did I say that it's NOT included in the rebuild kits?
Tap a new plug into the dowel pin hole. Take your centre punch and stake a small-scale amount of the remaining tab over the side of the plug, or secure the plug some other way if you're stuck without tab material.

Step thirteen: Rejoin the two halves of the pump using the half-dozen remaining screws and lock washers included in the kit. When finished you'll accept a pump that's ready to provide you with several years of trouble-free service.
Here's a final shot of the completed pump with the old parts and the remaining parts from the kit. The AMK kit includes two dowel pivot hole plugs (we but needed one) and a gasket to mount the pump to the engine block.
Source: https://www.428cobrajet.org/how-to-fuel-pump
Posted by: thomashisre1982.blogspot.com
0 Response to "How To Change A Fuel Pump On A 1968 428"
Post a Comment