

How To Change A Laptop Hard Drive
How to Upgrade Your Laptop's Hard Bulldoze to an SSD
At that place's no ameliorate way to speed up and upgrade a laptop than to replace its mechanical drive with an SSD (Solid State Drive). Certain, you tin can defragment your hard drive in Windows x, simply information technology won't meliorate your peformance similar an SSD would.
It's a no-brainer, merely if the thought of reinstalling Windows 10 and all of your programs and then tweaking all of their settings gives you the chills, don't worry. In an hour or two, you can hands be upwards and running with a clone of your current arrangement -- except now your laptop will take blazing performance.
Here's how to do it.
Before Y'all Begin: Check Upgradability

The process of upgrading your laptop to SSD is fairly unproblematic if you have like shooting fish in a barrel access to your hard bulldoze via a removable panel on the bottom of the laptop. If you have an Ultrabook or your laptop doesn't take that kind of like shooting fish in a barrel upgrade access (e.m., the bottom panel is sealed), it's a whole different ballgame, and yous'll demand to consult your laptop manual for instructions on getting to that drive and finding the correct replacement bulldoze. Otherwise, this tutorial will help those of you with the removable panel through preparing your laptop, cloning your system, and making the big bandy.
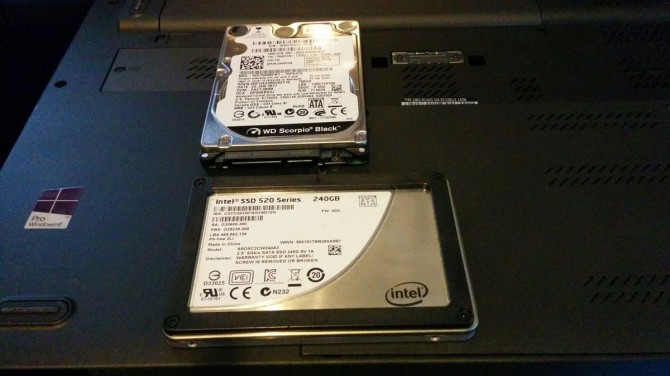
Find the correct SSD form cistron and interface. The other thing you'll want to check earlier you go out and buy a replacement SSD is your bulldoze's class factor; you need to make sure the drive volition fit in the laptop. Near laptops accept 2.5-inch drives, but ultraportable notebooks may use the 1.8-inch disk size. Also, even two.5-inch drives can have different thicknesses-- vii mm or 9.5 mm--and different interfaces (SATA or IDE, usually in laptops from 2008 or before). Laptops virtually widely utilise two.five-inch SATA drives , but you should bank check your laptop manual or specifications to make certain you buy the right size SSD with the proper interface. Alternatively, you may be able to find this data by visiting Crucial'due south Advisor Tool or looking at your electric current drive'south label: Open up the access panel and look on the drive itself to run across if information technology says 2.five-inch and SATA and what thickness you need. Generally, 7mm, ii.5-inch SATA SSDs will fit fifty-fifty in the 9.5mm slots and some come with spacers for a tighter fit.
MORE: 8 Biggest Tech Rip-Offs and How To Avoid Them
What You'll Demand
An SSD, of course . In improver to getting a drive with the right class gene and interface, you'll want to get an SSD with at least enough room for the Windows sectionalisation and whatsoever system recovery partitions. A 250GB Samsung SSD is currently about $89 on Amazon and a 500GB version is most $120. For near people, the 250GB drive should be fine, merely the 500GB ane offers more flexibility, for simply a niggling more investment.
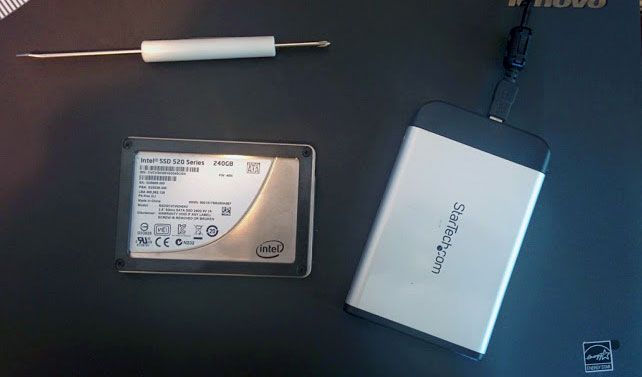
An external enclosure or adapter to connect that SSD to your laptop. For this how-to, we used a StarTech SATA external hard bulldoze enclosure , although there's an updated USB 3.0 version you might prefer ($24 on Amazon). Either mode, the enclosure comes in handy not simply for connecting the SSD for the cloning procedure, but also later to plough your current drive, in one case it'southward replaced by the SSD, into an external i for backups and other storage.
Small Phillips screwdriver.
Dissever external hard drive (optional). You lot might demand this if you have large folders, such as photos and videos, that might not fit on your SSD, and too to create a total system fill-in at the showtime.
More: 12 Dumbest PC Default Settings (and How to Change Them)
Gear up Your Electric current Drive for Cloning
First we need to practise a little prep work on your electric current drive.
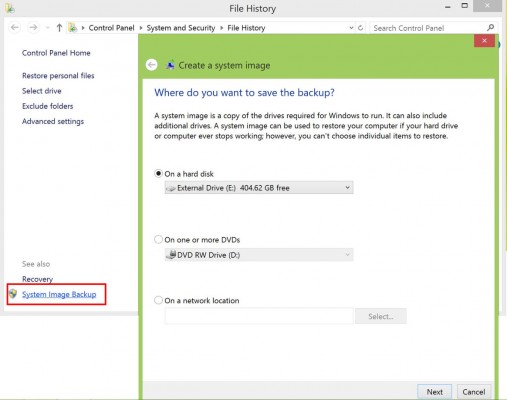
i. Make a total backup of your system.Create a organization image backup in Windows 10 past going to the Command Panel (hit the Win+X keyboard shortcut and select Control Panel), then go to "Salvage backup copies of your files with File History" (under Arrangement and Security). In the left menu, become to "System Image Backup" to create a organization image on an external drive or network location.
2. Motility large folders that don't need to exist kept on the SSD. Chances are your hard bulldoze is larger than the SSD you are transferring to (for example, moving from a 500GB HDD with lots of media files to a 120GB SSD). If this is the case, move larger folders--such equally those containing your photos, videos, games, and personal documents--to an external drive or other location to make enough space on your drive for cloning to the smaller SSD.
iii. Clean up your drive for additional space. This is also the fourth dimension to uninstall programs you aren't using anymore and delete unnecessary files that yous don't want carried over to your SSD. Brand one final uncluttering sweep with freeware CCleaner, which deletes one-time temp files and other space hogs, or at the very least run Windows' disk cleanup (in Windows search -- look for "disk cleanup," and then cull "Free upwards disk space on this PC").
Connect the SSD
Now we'll get the SSD prepare for the cloning process.
1. Physically connect the SSD. Place the SSD in the enclosure or connect information technology to the USB-to-SATA adapter, and so connect it to your laptop with the USB cablevision.

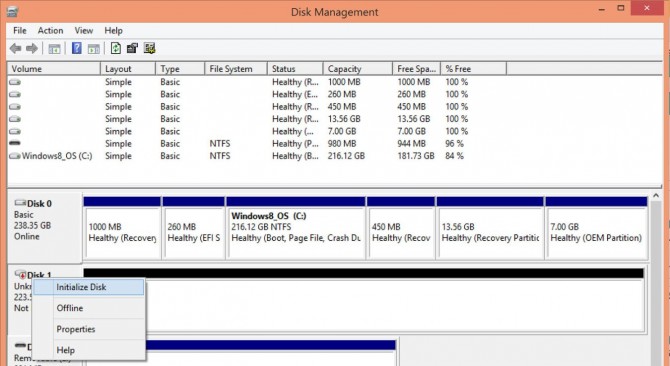
two. Initialize the SSD. If the SSD doesn't show up on your computer with a new drive alphabetic character, head to Windows' Deejay Direction tool. Bring upwardly Windows search again and expect for "deejay management," so choose "Create and format hard deejay partitions." In Disk Management, you lot should come across the SSD as a new disk under your current one. If it says "Not initialized," right-click on the bulldoze and cull "Initialize deejay."
3. Resize the current bulldoze sectionalization to exist the same size or smaller than the SSD. While y'all're in Disk Direction, check to come across if your electric current disk's primary partitioning (usually, C:, the one that has Windows and your installed programs) is larger than the SSD. If not, y'all'll need to shrink the partition so that it and the other arrangement recovery partitions are smaller than the SSD. Right-click on the OS sectionalization and choose "Shrink…"
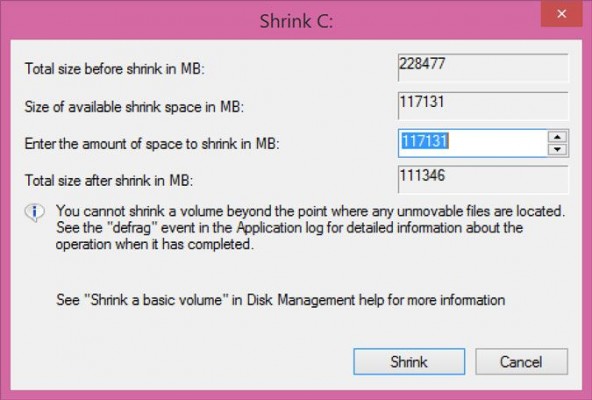
In the side by side window, leave the defaults and click "Shrink." This will resize the principal partitioning so it'south smaller and get out the residuum of the infinite every bit unallocated. Don't worry; during the cloning procedure, the cloning software will properly resize and allocate extra space to the primary sectionalization on your SSD.
At this time, you should restart your computer to make sure that the sectionalisation works before cloning.
MORE: 8 Essential Tips for Your New Windows 8 PC
Clone Your Difficult Bulldoze
Finally, information technology's time to clone your bulldoze to the SSD.
ane. Install disk cloning software. For this tutorial, we're using EaseUS Todo Backup Free, which is free for personal employ, has a user-friendly interface, and also optimizes the migration to an SSD.
ii. Select the source and destination drives in the cloning software. In EaseUS Todo Backup, select the "Clone" pick from the main menu. Follow the wizard to select your source disk (your HDD) and your destination (the SSD).
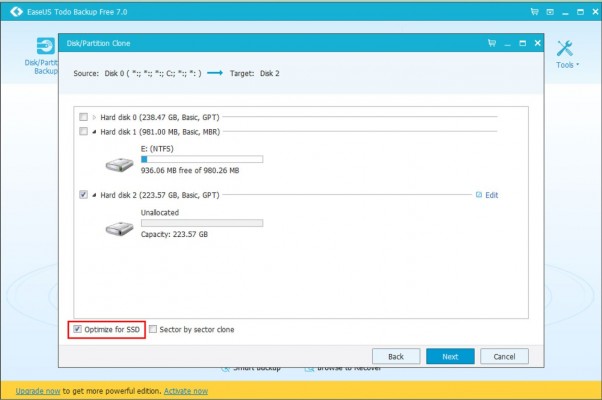
Note in particular that you lot should tick the "Optimize for SSD" option when y'all select the destination drive. This makes sure the sectors are aligned on your SSD and improves your chances of booting from the SSD subsequently the cloning procedure. (EaseUS notes that it'south not necessary to tick the "sector by sector" option, which copies every sector over, even if they're empty or bad.)
3. Review the layout and start cloning. In the side by side screen, you'll be able to compare the source bulldoze with your SSD. As yous come across below, EaseUS automatically adjusts for different-sized drives by using the unallocated space on your current bulldoze (which we created in step 3 of the last section).
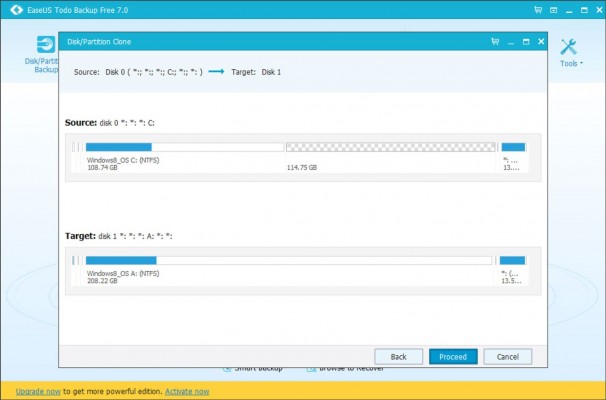
Click "Proceed" and so choose "Close downwardly reckoner when the operation completed." This took us virtually 45 minutes to complete, but your mileage may vary.
Physically Bandy Your Current Drive with the SSD
Now allow'south remove the sometime bulldoze and install the SSD.
1. Turn the reckoner off and remove the back panel. Plough your laptop off and then disconnect both the ability cablevision and any other connected cables -- including the SSD. And so unscrew the back panel and remove information technology to get access to your hard drive.
2. Wait for whatever screws securing your drive to the laptop.Y'all'll need to unscrew those before y'all tin remove the bulldoze.
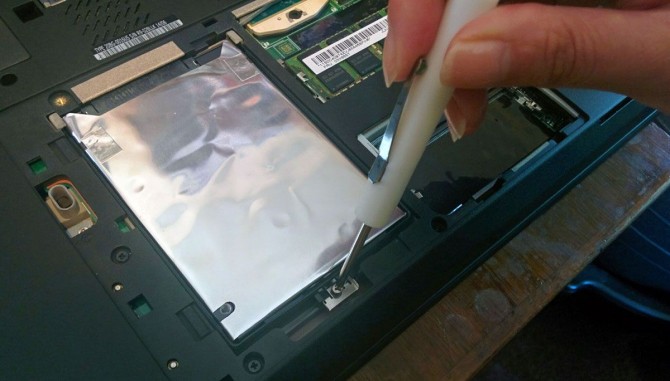
3. Lift the one-time bulldoze upward nigh 30 or 45 degrees and pull it out.
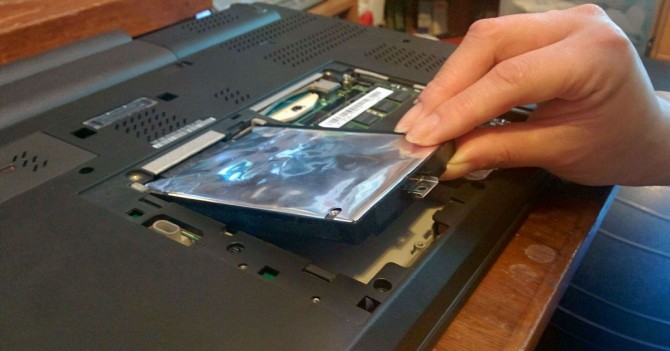
4. In its identify, install the SSD and put the back panel on. Install the SSD by doing the reverse of how you lot removed the HDD: Slide the bulldoze in at an angle and push it firmly into identify so it's fully connected to the interface. Then secure it with the screw you removed in the terminal step and, finally, spiral the dorsum console roofing the drive back on.
More: Laptop Interactive Buying Guide
Boot Upwards with the SSD
The moment of truth: Turn your laptop on. If your laptop boots every bit normal and yous see all of your programs and settings simply the way they were before (except much faster), all went well.
For one final test to see everything went equally planned, let's brand sure Windows recognizes your drive equally an SSD. Striking Win+Due south to search for "defrag" and select "Defragment and optimize your drives." In the Optimize Drives window, your bulldoze should be listed equally a Solid State Drive. Mission consummate!
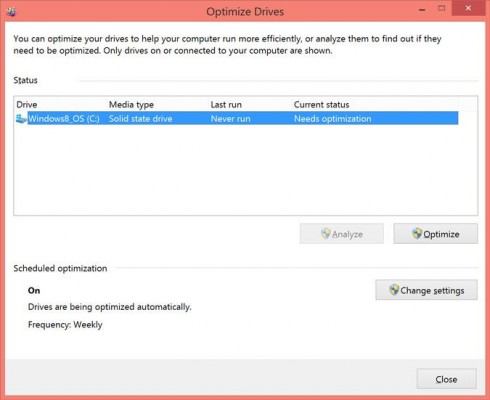
(By the way, SSDs should non exist defragmented. Windows x knows this. If it detects your bulldoze as an SSD, instead of defragmenting the drive, it will optimize it for the TRIM command, which improves the performance of your SSD. By default, your bulldoze will be automatically optimized.)
You tin now put your old bulldoze in the enclosure and wipe information technology in Deejay Management, peradventure moving your media files to this drive. Simply brand sure your automated backup organization (you take ane, right?) covers both your new internal bulldoze and connected external ones.
Another style yous can tell the migration worked? You're now booting up, launching programs, and multitasking so much faster than before.
Speed Tests: No Contest
To see only how much switching from an HDD to an SSD would impact performance, nosotros timed how long a Dell Inspiron xv 5000 with 8GB of RAM took to open a Word document with 1 page of text, a blank Excel spreadsheet and a new instance of Google Chrome. (Nosotros ran each test multiple times and took the average.)
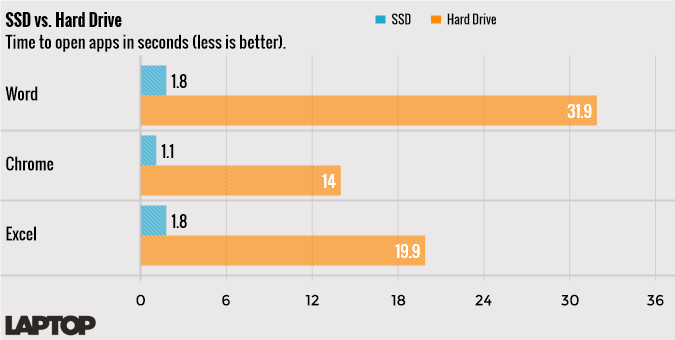
The 1TB, v,400 rpm Seagate HDD that came with the Inspiron took 31.ix seconds to open up the Give-and-take document, 19.9 seconds to open the Excel spreadsheet and 14 seconds to open up Chrome.
With a 250GB Samsung 850 EVO SSD installed, the laptop opened both Word and Excel in 1.8 seconds and Chrome in 1.1 seconds.
Additional contributions by Andrew E. Freedman
Windows ten Storage and Backup
- Previous Tip
- Side by side Tip
- Reclaim Difficult Drive Space by Shrinking Windows 10
- Delete the Windows.old Folder in Windows 10
- How to Save Space By Cleaning Windows' WinSxS Binder
- Support Files with the File History Feature
- Mount and Burn ISO Files
- Format a Hard Drive For Both Windows and Mac
- Zip a File or Folder in Windows x
- Control Which OneDrive Files Are Available Offline
- Map OneDrive as a Network Drive
- Fetch Any File on a Remote Computer with OneDrive
- three Means to Save Space
- Free Disk Space Automatically with Storage Sense
- All Windows x Tips
- How to Install Apps to an External Drive

Source: https://www.laptopmag.com/articles/ssd-upgrade-tutorial
Posted by: thomashisre1982.blogspot.com
0 Response to "How To Change A Laptop Hard Drive"
Post a Comment